Changes from a Leaf (Code) Selection
|
The figure at right shows the various options that can be selected when a Leaf node is selected in the Value Set Navigator window, and the right mouse button is clicked. In each case, the menu selection starts a process to define changes to be applied to the selected Coded Concept.
These selections are intended to cover all possible operations on a leaf node. In aggregate, the functions provided include:
- Move the code under another code;
- Retire (delete) the code;
- Update the code Description;
- Update the code Print Name; and
- Add an additional Print Name to the code.
|
 Menu selections from a leaf (code) node |
Move Code
Many of the Code Systems in HL7 have a hierarchical representation of the code contents such that placing one code "under" another means that the child code represents a subtype of the parent code. This code action moves a Concept Code from its original parent to a new parent in the Code System.
- Within the Value Set Navigator select the Leaf node that that is to be Moved
- Right click on the selected node
- Select Move Code (see menu at right)
- At present (Early October 2007) nothing happens and this function is not available.
|
|
Retire Code
Once a Coded Concept has been added to a Code System, its code value can never be reused. Thus one cannot delete a code, rather the code must be retired which prevents its future use or display.
- Within the Value Set Navigator select the Leaf node with the code to be retired.
- Right click on the selected node
- Select Retire Code (see menu at right)
|
|
- The wizard presents the Retire Code page (as at right)
- The upper pane of this page displays the particulars of the Coded Concept to be retired.
- The lower pane provides a check-box option to do a Permanent Delete. If this box is not checked, it will be possible to "un-retire" the code in the future. If the box is checked, the code must always remain retired.
- If the code is the correct one, and after checking the option, if desired, click Finish to complete the process.
|
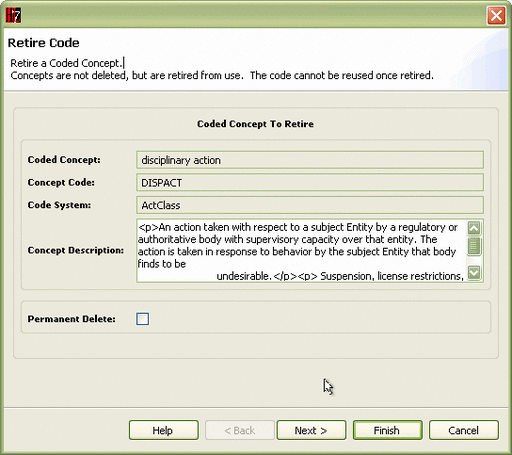 Retire Code: Select "Delete permanent" and verify |
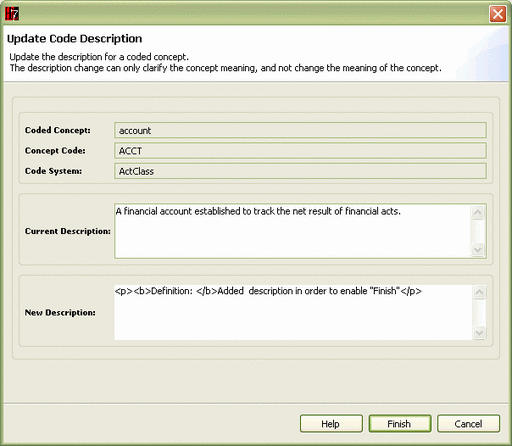
Update Code Description
This option provides the opportunity to replace the previous description for the Coded Concept with a new description.
- Within the Value Set Navigator select the Leaf node whose description is to be updated.
- Right click on the selected node
- Select Update Code Description (see menu at right)
|
|
- The wizard presents the Update Code Description page (as at right)
- The upper two panes provide the print name, code and current description for the concept.
- Enter the replacement description in the bottom pane. Note: you can "cut-and-paste the current description from above and edit this, if you prefer.
- When the New Description is satisfactory, click Finish.
|
 Update Description: enter new description |
Update Code PrintName
The print name for a Coded Concept can be updated using this function. In addition to the name itself, you can change the language of that proint name and whether it is the preferred print name for this concept.
- Within the Value Set Navigator select the Leaf node whose print name you which to change.
- Right click on the selected node
- Select Update Code PrintName (see menu at right)
|
 Update Code Print name: menu |
- The wizard presents the Update Code PrintName page (as at right)
- The upper pane shows the current print name, code and description.
- The lower pane includes:
- New PrintName field in which to enter the updated print name
- LanguageCode dropdown from which to select the language of the Print name
- Preferred check box. Checking this will make this Print Name preferred for the selected language, and will remove the preferred designation from all other print names for this concept in the same language.
- When the values are correct, click Finish
|
 Update Code Print name: Enter new name, language and preference. |
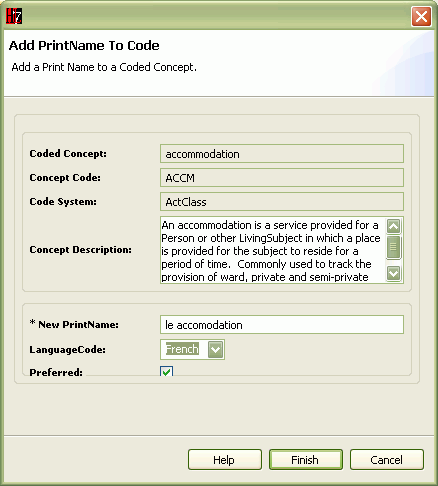
Add PrintName to Code
A Coded Concept may have multiple (alternate) print names. Expressed in multiple languages. For each language, one of the print names can be designated as preferred for the Coded Concept in that language. This option allows one to add a new print name to an existing Coded Concept.
- Within the Value Set Navigator select the Leaf node for which a print name is to be added.
- Right click on the selected node
- Select Add PrintName to Code (see menu at right)
|
|
- The wizard presents the Add PrintName to Code page (as at right)
- The top pane presents a current print name, the code and description for the selected Coded Concept
- The lower pane includes fields for defining the new print name:
- New PrintName field in which to enter the new print name
- LanguageCode dropdown from which to select the language of the new Print name
- Preferred check box. Checking this will make this Print Name preferred for the selected language, and will remove the preferred designation from all other print names for this concept in the same language.
- When the values are correct, click Finish
|
 Add Print Name: enter name, language, preference |


