Introduction
This is a Do It Yourself - Step-by-Step exercise that leads you through the steps necessary to
Requirements
In order to do this exercise, you will need:
Tutorial layout
In this exercise:
- Each step is defined by text on the left and a resulting "screen-shot" on the right
- The text includes a short title followed by a numbered sequence of instructions or comments.
- Where the instructions require text to be entered into a form, the text is usually shown on the screen shot rather than in the instructions.
- The result of the step is the screen-shot shown to the immediate right of the instructions.
- When you execute the step, your application (or a portion of it) should be similar but not identical to the screen shot.
- because of the instructions-left/results/right pairing, several of the instruction sequences start with a phrase like "Press SomeButton (on previous screen)"
- That is, the button or control to be selected is shown on the previous screen shot.
Startup
|
Start the program
- Start the Harmonization Editor application
|
 Newly started Harmonization Editor with notes |
|
Load Vocabulary
- Select Menu...File...Load Vocabulary
- In the file system browser, select your design repository
- Click Open
|
 Harmonization Editor with fresh vocabulary load |
|
Populate Value Set Navigator pane
- Click on Concept Domain Tree tab
- Scroll down until you can see ActClass
- Click on ActClass to select it
|
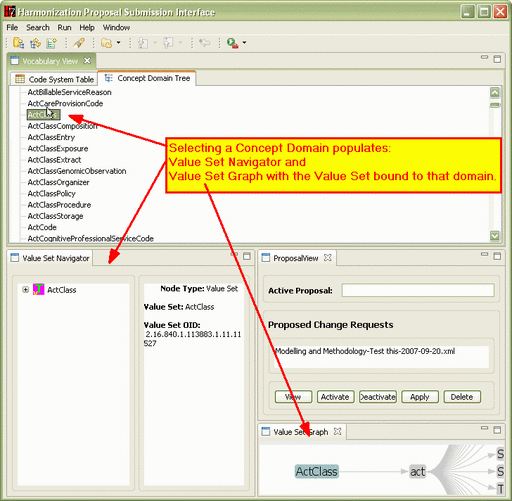 Harmonization Editor with Domain selected |
- Jump to top of page
|
Initiate change proposal
- Select Menu...File...Create New Vocabulary Change Request
- This is the panel in which you enter the primary proposal identification data
|
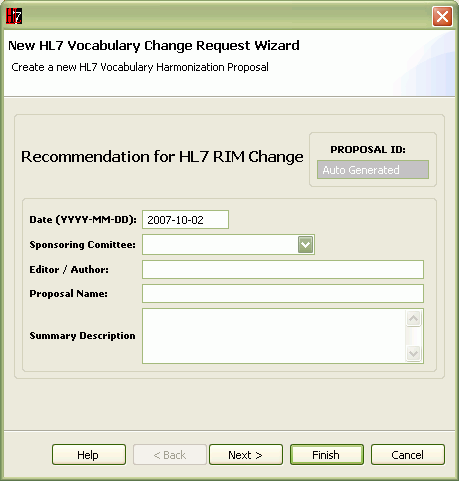 First Proposal Definition dialog |
|
Add identifying data to form
- Use drop-downs and text entry to add text shown at right
- Note tool tips that appear when you hover over a box
|
 Proposal data filled in, also showing tool tip |
|
Add supporting text
- Click Next (on the previous screen)
- This is the first of four dialogs for entering supporting information as indicated in the text pane
- You do not need to enter anything in this box
|
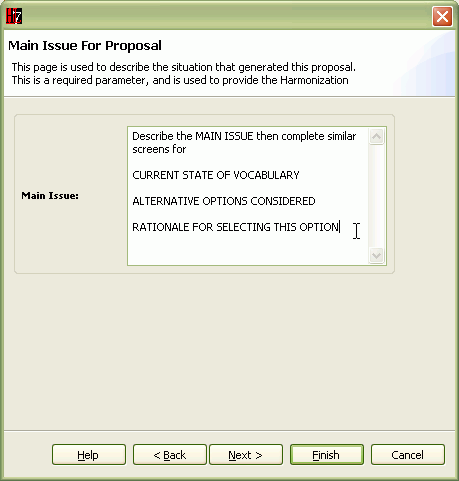 Proposal Text dialog for Main Issue (and others) |
|
Complete creation of proposal header
- Click Next (on the previous screen)
- Note that an entry for your proposal has been added in the Proposed Change Requests box of the Proposal View
- Note that your new request as automatically activated and thus is the Active Proposal
|
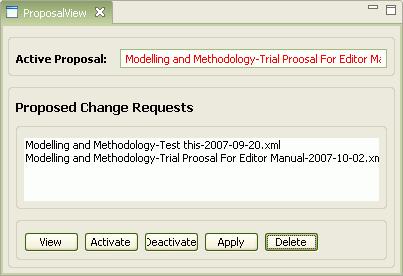 Proposal view frame with new proposal shown and activated |
|
Display initial proposal in browser
- Click View (on the previous screen)
- This is an XML viewer that will allow you to review the content of your proposal as it currently stands. (The Edit button and Edit XML tab do not currently do anything.)
- If you wish to edit any of the meta-data about the proposal, the Edit Meta-data Wizard button would take you back to the screen three above here.
|
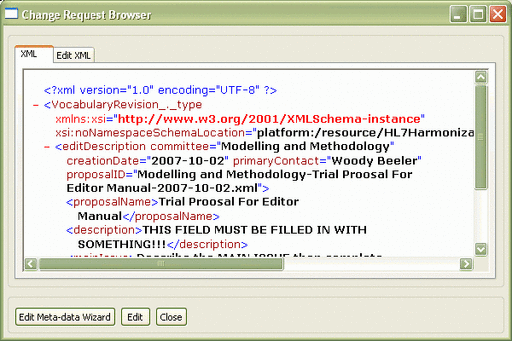 Change Request Browser showing new proposal |
- Jump to top of page
Add Code
- Click Close (on the previous screen)
- Look at the Value Set Navigator pane (lower left)
- Click on the +/- box to the left of the ActClass node in order to expand the branch
- Click on the +/- box to the left of the act node in order to expand the branch
- Click on the act node to select it.
- Right-click on the act node to see the value set operations menu as shown at right
|
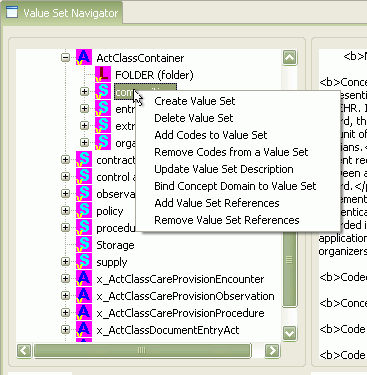 Right-click menu for a Value Set node in Value Set Navigator tree |
|
Begin to add code to selected value set
- Select the Add Codes to Value Set option on the value set operations menu (on previous figure)
- At right is the first of a set of dialogs used to add coded concepts to a value set
- The values set to which the codes will be added is shown in the upper half. This is the value set on which you right-clicked in the Value Set Navigator
- Select the radio button to Create a new Coded Concept...
- The other choice is used to (re-)assign existing codes to value sets.
|
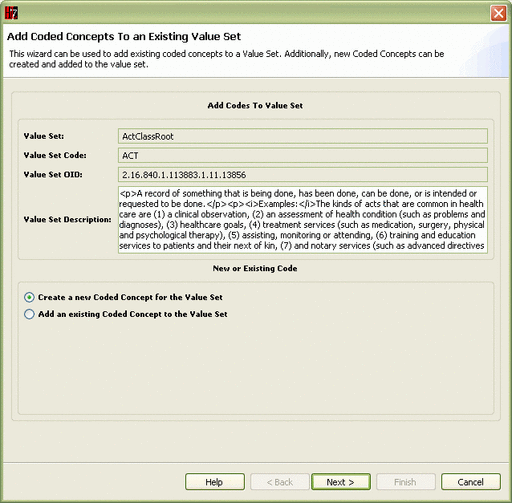 Add coded concepts to value set (dialog) |
|
Add new coded concept to Code System
- Click Next (on the previous screen)
- This is the panel used to add a new coded concept to a Code System
- Note that the Code System was automatically selected based on the code system whose codes make up the existing value set.
- Use the data on the figure at right to fill out your form
|
 Add new code to Code System (dialog) |
|
Verify concept to be added to value set
- Click Next (on the previous screen)
- This screen is a verification step showing the value set above and the code to be added below. If these were in error, the Back button would allow correction.
|
 Verify Code to add to Value Set (Dialog) |
|
Review value set addition(s)
- Click Next (on the previous screen)
- The screen at right summarizes the actions taken so far. The Value set being expanded is shown above, and the list of concepts (only one, here) being added is shown below.
- If you wished to add more codes, you could click the Next button here, which would return you to the "create/add" screen three above, but do not do this for this example exercise.
|
 List of codes to be added to Value Set (dialog) |
- Jump to top of page
Review Proposal
|
Review proposal as an XML command file
- Click Finish (on the previous screen)
- This is an OPTIONAL REVIEW STEP
- The xml content of a change proposal file is shown at right. It should be pretty close to the change Request you just finished creating. To compare these do one of the following:
- Click the View button on the ProposalView pane to open the internal proposal reviewer, or
- Use a program like XML Spy to open the file:
C:\russ\projects\development\ HL7Tooling\HL7HarmonizationTooling\ resources\requestedProposals Modelling and Methodology-Trial Proosal For Editor Manual-2007-10-02.xml
|
 XML file content for example code addition |
- Jump to top of page
Apply Changes
|
"Activate" proposal and apply changes to data base
- On the ProposalView pane:
- Click on your proposal file in the list of Proposed Change Requests to select it
- Click Activate and verify your proposal is shown as the Active Proposal
- Click Apply
- The Apply button should appear to remain depressed and after a bit of grinding, the pane at right should appear.
- This pane is a display of the process log that applied the selected change control against your data base
- If this panel does not appear after 30-60 seconds, or if the Apply button no longer appears depressed, your change proposal did not get processed. The most likely reason is that you did not fill in one of the fields on the proposal meta-data entry form. You can View your proposal and the select Edit Meta-data Wizard to verify this.
|
 Start of log from Applying update showing steps |
|
Verify successful completion of update
- Use the log scroll bar to scroll to the bottom of the log.
- The last line should read Successful load!
|
 End of log from Applying update showing successful completion |
- Jump to top of page
Review Results
|
Note "prior state" of value set view
- Click Close (on the previous screen)
- Check your Value Set Navigator pane. It should still be showing the old data, as at right.
|
 Value set tree before "refreshing" pane to see change |
|
Refresh view to see change added
- Click on the ActClass line in the Concept Domain Tree (upper panel)
- After the Value Set Navigator contents refresh, click on the +/- box to the left of the ActClass node in order to expand the branch
- Click on the +/- box to the left of the act node in order to expand the branch
- Abra-ca-dabra the AAR (aardvark) has been added to your Act Class vocabulary. You should also see this if you use RoseTree to browse the same repository.
|
 Value set tree after "refreshing" pane to see change |
- Jump to top of page
Remove Changes
|
Restore data base to prior state
- When you are ready to remove this change from you database, Select Menu...File...Restore Vocabulary
- After a bit of machination, the dialog at right should appear verifying the data base was restored to its earlier state.
|
 Database restoration notice |
|
Delete change proposal file
- To delete your example Change Request, go to the ProposalView pane. In that pane:
- Select your example proposal in the Proposed Change Requests list (this step may be unnecessary)
- Click on the Activate button (this step may be unnecessary)
- Click on the Delete button
- Verify that your example is the one to be deleted. If it is not, click Cancel and repet the selection steps above.
|
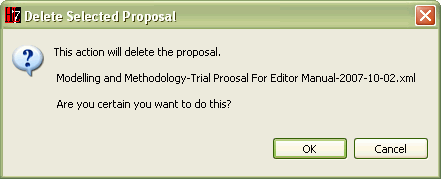 Dialog to verify change proposal deletion |
|
Close the application
- Click OK (on previous screen)
- Select Menu...File...Exit
|
HERE ENDETH THE LESSON
|
- Jump to top of page


