Installing and Configuring HL7 V3 Tools
Contents
- 1 Introduction
- 2 Background
- 3 Supported Platforms
- 4 "Generic" Installation Instructions & Other System Preparation
- 4.1 Installations on Windows XP, Windows 7 and Windows 8
- 4.2 Installation of HL7 Tools on Windows Vista
- 4.3 System Preparation For RMIM Designer
- 4.4 Installing Prerequisites for Windows-based WYSIWYG Annotation Editor
- 5 Installing Specific HL7-provided software
- 5.1 Dependencies
- 5.2 Download Location & Idiosyncrasies of specific HL7 software
- 5.3 Eclipse
Introduction
These pages provide documentation on installing HL7 tools, configuring operating systems and COTS tools (like Visio) for using these tools, etc.
An html release of this document (which may not be current can be downloaded as "Tools - Find Install and Setup" under the Tooling Documentation project on GForge. This Wiki page is intended to be the current information.
Background
As HL7 began developing its V3 model-driven architecture in the late 1990's, it adopted the principle that the specifications developed should be "machine processable" rather than just word-processor documents. In turn, this decision led to the need for data-bases or other processable file formats and for tools to build, maintain, browse and publish the contents of those files.
Inevitably, individual HL7 participants developed such tools and contributed them for use in developing and implementing V3. In aggregate, over a dozen individuals from as many different companies and from several different countries have had a major role in providing these tools. This document provides an overview of how to assemble and install the tools that are in wide-spread use near the end of 2010 (and later).
Supported Platforms
Over half of the current (2013) tools are Windows based, but a growing percentage are programmed in Java for use either under Java as a "command line" process or run under the Eclipse Development Framework. Clearly, tools in the latter category can be installed on a variety of operating systems.
Windows Platforms
In the Windows environments, the HL7 tools function on Windows XP, Vista, Windows 7 and Windows 8 with no limitations. Further, all solutions have been tested on both 32-bit and 64-bit versions of Windows 7 and 8 (see, also, note on Visio dependency in 64-bit systems listed under "Visio" below). Other support software required within Windows include:
- A Java "run-time" environment (JRE). (See discussion of Java Platform.) below.
- An Eclipse Framework installation. (See discussion of Eclipse Framework below.)
- MSXML support (installed as part of HL7 Tools that require it).
- "Office" software –
- Access 2000 (or later) is very useful and is required to run the "Publishing database". It is not required for the other tools.
- Excel is useful for displaying message designs, but is not required.
- Visio – Microsoft Visio, - 2002, 2003, 2007, 2010 or 2013 - is required to use the RMIM Designer tool. Note that Visio is an "Office" component. There is a constraint - RMIM Designer will not run in 64-bit Visio. See Documentation linked elsewhere on the HL7 Wiki.
- Access 2000 (or later) is very useful and is required to run the "Publishing database". It is not required for the other tools.
- XMLspy (from Altova) – provides the WYSIWYG (what-you-see-is-what-you-get) editor for the PubDb and is very useful for reviewing schemas, XML exports, etc.
Java Platform
A number of the HL7 tools, are Java-based and require a Java run-time environment to be installed. The most current releases are 1.7.x (aka Java Version 7 Update x). One can get downloads from Sun's Java.com website. Find the installer appropriate for your operating system and follow the instructions provided by Sun. (To verify your Java installation, open a "DOS window" or "Command prompt"; type in "java –version" and press "enter". If you have a JRE installed, the system will return the version identification,, such as java version "1.7.0_07". If you have no JRE, the command will report an error such as 'java' is not recognized as an internal or external command, operable program or batch file..
Eclipse Framework
Several HL7 tools, as well as HL7's version control system run in "Eclipse." Eclipse is an organization sustaining a number of open-source software projects. For HL7 tools, two specific projects are of current (2012) interest. First, is the so-called Eclipse Platform which provides a minimal basic foundation for functions such as version control, and fully packaged applications. The second is the Eclipse Web tools Platform project. The latter includes the software necessary to run a number of the most recent HL7 tool that manipulate models in MIF files.
In order to download Eclipse software, it is necessary to navigate to the correct project, find the latest release, and then select the download appropriate to your operating environment. First, go to the Eclipse.org download page where the various Eclipse downloads are organized according to the project in which they fall.
- Eclipse Platform – is found under Eclipse Project.
- Click on the name Eclipse Project on the line that begins this project listing. This takes you to the downloads page for that project.
- Next, click on the Build Name link to the Latest Release.
- Scroll way down (several screens) the page to find the Platform Runtime Binary downloads. These provide the minimum functionality, they are also the smallest downloads in the Eclipse family.
- Web tools Project -- is found under Eclipse Web Tools Platform Project -
- In September 2010, while attempting to update this, I discovered that there is no longer a "Web tools Project" The remainder of this sub-set of instructions have been amended to take one to the all-in-one project under the "Web Tools Platform Project" GWBeeler.
- Click on the name Eclipse Web Tools Platform Project on the line that begins this project listing. This takes you to the downloads page for that project.
- Next, click on the Build Name link for the first Released build.
- Then, find the recommended All-In-One package appropriate to your environment. The all-in-one packaged include both the eclipse foundation products, as well as all other prerequisites for the project. Although this is a large installation, it ensures that all required elements are found.
SVN (Subversion) Version Control Clients
HL7 uses Subversion (SVN) to provide version control of its standards documents and tools. Although some SVN functions can be performed with a browser (see the "SVN" tab under individual HL7 projects on G-Forge) routine use of SVN requires one or more the following three tools:
- A Subversion client that is integrated with the file manager (such as Windows Explorer) of the host system;
- A "command-line" client that can be executed from the UNIX or DOS command line and that, for DOS, is installed as part of the "inegrated" tool; and/or
- A client that is part of the file management capability of a platform like Eclipse.
SVN Client integrated with file Manager and Command-line Client
Probably the most commonly used SVN client for Windows is http://tortoisesvn.tigris.org/. Selecting the download links from that site will lead to a place to acquire the files and instructions on installation. Moreover, the 1.7.10 releases and later include a command line client that previously had to be downloaded separately
To test whether you already have a command-line client installed, open a DOS window (cmd.exe) and enter SVN (return). If you get a response that 'svn' is not recognized as an internal or external command, operable program or batch file. then there is no such client installed.
SVN Client to Provide Version Control in Eclipse
The SVN client for version control in Eclipse is provided at www.eclipse.org/subversive/. Click on the downloads selection and follow the instructions provided there.
"Generic" Installation Instructions & Other System Preparation
Installations on Windows XP, Windows 7 and Windows 8
All of the tool installers for use with Windows are configured with the correct defaults for installing in Windows, except Vista. General notes on these installers include:
- If a given tool was previously installed on this machine, running the installer (double-clicking, etc.) will cause the installer to open with a dialog that asks you to select whether to Repair or Remove the application. Obviously, you can chicken out and Cancel the operation, but if you really wish to install a new release, you should select Remove the application. Then run the installer a second time, and you should get the result in the following step.
- If the tool as not been installed or has been removed, running the installer (double-clicking, etc.) will cause the installer to open with a dialog that Welcomes to the installer, says it will guide you through the installation and suggests Click Next to continue. Click Next as suggested.
- The installer asks you to accept a license agreement. These are simple agreements that license use for HL7 standards development and ask you to hold the developer harmless if the software fails to perform. Click Accept and then Next.
- The third installer step offers a default installation directory of C:\Program Files\HL7\. We recommend this default as it will aggregate all HL7 software in the same area of your file system. Several of the HL7 applications store data or scratch files within the installation directory. If your administrator has "locked" your C:\Program Files directory it will be necessary to select a default directory outside of that space.
Installation of HL7 Tools on Windows Vista
Windows Vista imposes new security rules on installation of software, particularly untrusted software. Because of the expense involved in certifying HL7 volunteer-developed tools as trusted, the Tooling Committee as opted to leave the software as untrusted, but this requires that it be installed outside of the C:\Program files directories. For this reason, HL7 has provided a program named HL7ToolsVistaInstaller to manage the installation of all HL7-provided tools in Vista. This program changes the default installation directory from C:\Program Files\HL7\ to C:\HL7Programs\HL7\, thus keeping the programs together in a single directory space.
Installing HL7ToolsVistaInstaller
- Find and download the most recent release of the Vista Tools Installer in the Vista Compatibility Project on GForge. It will have a file name like hl7tools_vistainstaller-1.x.y.msi.
- If the installer asks whether to Repair or Remove the program, it means there is a version already installed on your system. Select Remove. When the removal is complete, Run the msi again, and it will install.
- The installer will attempt to install in directory C:\Program files\HL7\ToolInstallerForVista. This is okay for this particular Vista installation, even though the common HL7 tools will not be installed under Program files.
- Documentation is installed in same directory.
Using HL7ToolsVistaInstaller to install HL7 software
All HL7 Tools installed in Vista from MSI (Microsoft installer) files should be installed with the HL7ToolsVistaInstaller widget. It places the programs under the C:\HL7Programs\HL7\ directory recommended to satisfy security restrictions imposed by Vista. It also simplifies the installation Remove for those applications that are being updated rather than installed anew. To use this tool:
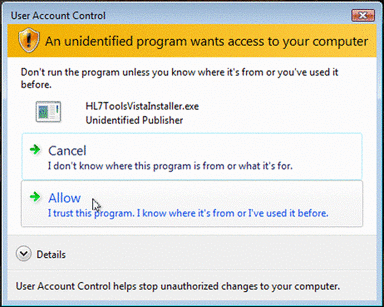
- Run HL7ToolsVistaInstaller (an icon was placed on your All Programs list). As is common in Vista, the Vista Trust Center will dim your screen and open an access permission dialog like the following. Select Allow to open the widget.
- Next, The installer widget opens with the following dialog box. Use this dialog to browse to and select the installer you wish to run, and then click Open
- With the msi file selected, the widget window, as shown below, appears. The top text pane is a set of mini-instructions; the second pane shows the directory from which the installer was selected; and the third pane shows the installer file name.
- Change the Install count, if desired, using the radio buttons at lower left. Recall that installing an update requires running the installer twice – once to Remove the old installation and a second time to do the new install. The default Install count of Twice will activate the installer twice for you.
- If you are satisfied with the selections, click Install now to start the installation. The target installation directory will be selected as C:\HL7Programs\HL7. Note that this widget will start the installer, but you can choose to cancel the installation or change the target directory from within the installer, if you wish.
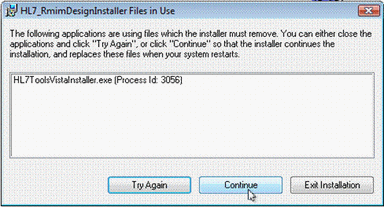
- If you are doing a Remove/Install two-step, you may receive the following Files in Use warning during the Remove step. Simply click Continue and the install run will proceed.
System Preparation For RMIM Designer
For all environments, install the Java and Eclipse environments before installing the HL7-specific products.
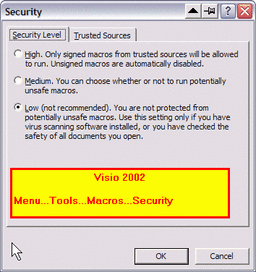
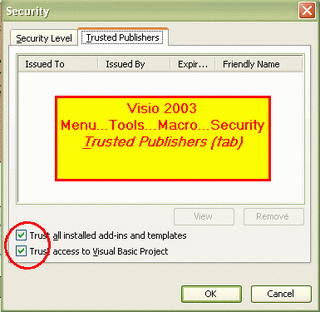
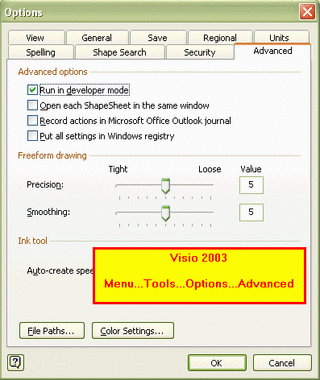
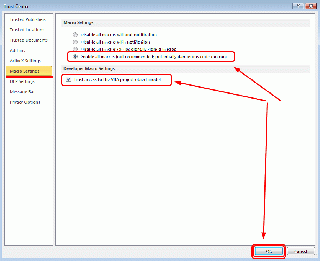
If you will be using the RMIM Designer in Visio, install your Visio tool, using standard installation defaults before proceeding. After that, each of the Visio installations will need to have specific security parameters set in order to run the HL7 RMIM Designer. The sub-topics below display one or more "screen-shots" from the Visio release being configured. To get to the dialog shown in the "screen-shot", use the menu selections shown in the yellow box that overlays the "screen-shot. Then make the selections as shown, and click "OK".
Preparing Visio 2002 Security for RMIM Designer
Preparing Visio 2003 Security for RMIM Designer
Preparing Visio 2007 Security for RMIM Designer
Preparing Visio 2010 and Visio 2013 Security for RMIM Designer
- Select Menu...File...Options...Trust Center (for left hand pane) and
- Select Menu...File...Options...Trust Center...Trust Center Settings (for right hand pane)
Visio 2013 - Enabling Display of Vocabulary Descriptions in HTML
Changes that Microsoft made in Office 2013 (and therefore in Visio 2013) "broke" the HTML display of vocabulary descriptive text. Releases of RMIM Designer 4.8.0 and later run in Visio 2013 with no change, but a further security change to re-enable this display is designated in the RMIM Designer Documentation.
Installing Prerequisites for Windows-based WYSIWYG Annotation Editor
If you will be using the HL7 WYSIWYG Annotation Editor that runs in Windows, there are two essential prerequisites: a Web server, typically Microsoft IIS must be installed, and the open source product Tiny MCE must be installed.
The new editor uses the Tiny MCE editor as its base. TinyMCE is designed for use on web pages picked up from the server. In order to enable editors to work on HL7 artifacts when they are not web-connected, it is necessary to provide a local Web server to support the Tiny editor. The Microsoft IIS product is a standard component of both Windows XP, and Windows 7, but it is not installed by default when Windows is installed.
IIS can be installed from the installation "disk" for your base operating system. Once installed, it designates an area in your files system (typically, C.:\Inetpub) for the server files and a web "root" directory (C.:\Inetpub\wwwroot) as the "root" of the files that it serves. Once installed, the IIS product can be configured to recognize a specific TCP/IP "port" from which it will accept requests for web pages. It is possible to close down that port in your "firewall" while still using the server from your installed browser. This, in effect, blocks access to the Web server from any external sources, thus maintaining a reasonable degree of security for your system.
Installing IIS - a "local" Web Server
To install IIS on your system do the following:
- Have an installation CD available, because the installer may ask for it.
- Open the Control Panel, and select Add or Remove Programs (Windows XP) or Uninstall a Program (Windows7)
- On the left-hand pane select Add/Remove Windows Components (Windows XP) or Turn Windows Features on or Off (Windows7)
- This will open a Windows Components Wizard (WinXp) or a Windows Features (Win7) dialog which includes a list box with a variety of components or features to be installed. If they are not already selected, select the entries for:
- Internet Information Services (IIS) and
- Management and Monitoring Tools
- Select Finish or Next to move through the wizard. At some stage, you may be required to provide the Windows installation disk.
A Microsoft support page for this installation he found here for windows XP and here for Windows7. It is not necessary to install any other "Features" or "Advanced Options" in order to use these tools.
The the proper installation of IIS can be verified by opening your web browser and entering the following string http://localhost/iishelp/(XP) This should bring up a page whose title relates to IIS.
The URL localhost is the textual representation of the Web server mounted on the same operating system as the browser. It's numeric address is "127.0.0.1".
Installing TinyMCE WYSIWYG Web Editor
The installation of Tiny MCE is simply a matter of downloading the product from the Tiny website, and extracting the appropriate files into the root directory of your newly installed Web server. The steps are as follows:
- Go to the home website for TinyMCE
- click on the Download button on right
- This will take you to a page on which multiple options are available. You want the topmost selection on the page - the package that says it "Contains all you need for production usage." (There is a new release of this product approximately every week each with a minor set of BUG fixes, although most such BUGS represent strange software edge cases for various downstream "server-side" software.)
- Selection of the preceding download will provide you with a file and name like tinymce_3.4.3.1.zip.
- Place this Zip archive in the newly created "root directory" of your Web server C:\Inetpub\wwwroot. (This directory will have a few "gif" and "asp" files are already in it.)
- Extract the zip archive so that it's contents are placed in the "wwwroot" directory.
- This will create a new subdirectory tinymce, and completes the installation of TinyMCE.
- Use the following URL to test the installation - http://localhost/tinymce/examples/index.html. This should bring up a selection of TinyMCE configurations for review.
Installing Specific HL7-provided software
Dependencies
Although few of the HL7-provided applications are "integrated", there are inter-dependencies between the products and support files that can be downloaded from the HL7 tools site on GForge. Specifically:
- Several of the tools will require you to have an HL7 Design Repository (Access database) available on your system. This database holds the complete specification of the HL7 Reference Information Model, as well as the complete contents of the HL7-maintained terminologies.
- V3 Publishing tools and the RMIM Designer (in Visio) gain support for some functions from RoseTree. The RMIM Designer uses RoseTree functionality to gain access to the RIM and vocabulary specifications stored in the Design Repository. The V3 Publishing Tool uses RoseTree to: (a) extract publishable content from the PubDb and (b) extract Visio graphics and clickable graphic maps from designs prepared in the RMIM Designer. Therefore RoseTree must be installed before the RMIM Designer is installed, and may be required to support V3 Publishing for selected functions.
Download Location & Idiosyncrasies of specific HL7 software
V3 Publishing Tools - Publisher and Generator Combined
This tool packages both a version of the V3 publishing harness and a version of the V3 Generator as a unified package. It is distributed under the XML Publication Process Project on Gforge. The downloadable distributions include two required components and one optional component. The distribution component labels contain four parts:
- hl7_v3publishingtools- that identifies the tools;
- a version string like 2.0.0-3.4.0 that reflects the release number of the publishing tools (left of the hyphen) and the release number of the Generator (left of the hyphen);
- a string identifying the content type as:
- -Base contains the base set of tools, including those that drive the Generator. The tool suit "home" directory is wherever this package is installed.
- -Generator contains a complete release of the V3 Generator "tools" package. Although one might substitute an independent Generator release form the Generator Project, users are strongly encouraged to use this download as it has been tested in conjunction with the -Base tools. The -Generator may be installed in a directory away from (on a different drive, for example) the -Base component.
- -Content contains files from sub-directories of the "input" directory for -Base. Thus they must be installed in the same directory space as -Base.
- an optional string identifying the sub-types of content like:
- -SupportModels. This is the only sub-type currently being distributed. It contains source files from input/welcome/issues (to allow publishing QA Reviews), from input/welcome/glossary (for glossary management), and sub-directories of input/infrastructure for RIM, data types and vocabulary content.
Publishing Tools Prerequisites
The publishing tools have the following software prerequisites:
- SVN File System Client or SVN Eclipse Client - The entire publishing package is predicated upon access to, and control of content that is maintained in SVN. Which client you choose (or both) will depending upon whether you wish to manage your content through Eclipse or with a GUI-client integrated with the file system.
- Command-line client for SVN - The publishing tools provide for automatic "export" of source content from SVN provided that a command-line SVN client is provided. Absent this, users will have to manually control selected export through the client selected above.
- RoseTree will be required if you intend to extract domain content from a PubDb for publishing, or if you need to extract "clickable graphics" for static models developed in the HL7 RMIM Designer (in Visio).
Installation steps and configurations for combined publishing tool
- 1) Download the packages from Gforge, typically including both the -Base and -Generator components.
- 2) Select a directory under which you wish to place the base of this package. (The installers will great a directory named like v3publishing-2.0.0-3.4.0 as a child of the directory in which the ZIP files are placed for extraction.)
- If the package will be installed as a unit (the norm), place both zip files in this directory.
- If the Generator is to be installed under a different directory (even on a different drive), place the -Base component in the base directory, and the -Generator archive in its own directory.
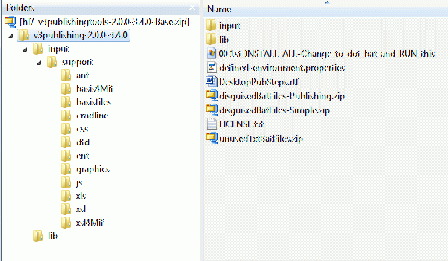
- 3) Unzip both archives preserving the directory structure within the archive. The resulting directory structures and file content of the root directory look like the following:
- Needless to say if the two archives are extracted to the same directory, the results is combination of the two images. (If both archives are extracted to a single directory, you will be asked to allow an over-write of three files.)
- NOTE: You can re-name the root directory(ies) to anything you like once the files have been extracted from the ZIP archives.
- 4) Note that the "input" directories of the publisher and the "InputFiles" directories have no content except for "input/support" (tools) and "InputFiles/CommonSourceFiles" for the RIM, Vocabulary, etc. used in the generation process. All other content must be exported from SVN.
- 5) Completing the installation is the next step. as delivered, the "BAT" files used for command-line execution of the publishing tools are still in a zip archive and "disguised" (changed extension names) in order to get past security blocks that preclude sending *.bat files in e-mail or archives. The extraction process depends on whether or not the Generator components are co-located with the base components as:
- If base and generator are co-located, Rename the file 00.00_1st_INSTALL_ALL_Change_to_dot_bat_and_RUN_this by adding a .bat extension to it. Then "run" the file by double-clicking on it. (License acceptance is discussed in step 6, below.)
- If generator is located separately:
- Open file defined-environment.properties. (Note that the purpose of each property is documented in the file) Scroll down to where the property set.dir.generator is to be set (about line 110) and enter the complete directory path where the generator was installed. The result might look like set.dir.generator=H:/Tools/v3publishing-2.0.0-3.4.0. Save the properties file.
- Perform the install as identified in the first bullet under (5), above.
- If you do not wish to run the generator independently delete the file named 00.00_1st_INSTALL_GENERATOR_Change_to_dot_bat_and_RUN_this, otherwise rename that file by adding a .bat extension to it and run it by double-clicking. This will extract the generator-specific command-line files.
- 6) License acceptance as the "installation" process proceeds in step (5), you will be asked to confirm acceptance of the license. (Stored in the LICENSE.txt file of the root directory.) The complete license will be displayed on the command-line log (or the console output in Eclipse) followed by the question whether or not you accept the license. The script will accept only YES or NO as valid responses and will default to NO if not entry is made.
- On the command-line (BAT file) interaction, the License and inquiry will appear sequentially in the command-line window, and requires a keyboard response.
- In Eclipse, the license will be displayed in the "console" view, and the query will appear in a separate "pop-up" dialog box. The response in the Eclipse dialog box must be selected from the "drop-down" immediately below the prompt and above the buttons. Click "OK" once the selection has been made
- 7) Set software environment properties. The final installation step is to set the four parameters that define the software environment on your machine. These are found in file defined-environment.properties in the root directory of the base installation. The properties of interest all fall into the ENVIRONMENT DEFINITION that begins around line 64. They are:
- set.dir.generator (around line 110) This property is valued with the absolute path to the root directory of the generator component. (Use the forward slash (/) for the path delimiter.) It only needs valuing if the Generator component is not co-located with the base, in which case it should have been set as part of step (5).
- set.dir.output (around line 130) This property allows the output directories (which hold the final html content for the publication) to be located away from the base. It only needs valuing if the output will not be co-located with the base. In that circumstance, set this property to the absolute path of the alternate output root directory. (Use the forward slash (/) for the path delimiter.)
- VisioVersion (around line 139) This property must be set if you intend to use Visio to export "clickable graphics" and if you are using a Visio version later than Visio 2002.
- UsingVistaInstaller (around line 148) This property must be set if you are using Windows Vista (or Windows 7) and are using the HL7 Tools Vista Installer to install RoseTree.
- 8) If you plan to run the tools from within Eclipse, you will need to follow an additional Eclipse configuration step that has been documented under the general tool documentation.
This completes the basic installation.
Design Repository
- Distributed as rimRepos (a ZIP file) under the Design Repository project at GForge
- Holds the reference specification for the HL7 RIM and vocabulary
- Required by RMIM Designer.
RoseTree
- Distributed as RoseTreeIII under the RoseTree Project at GForge
- Functions:
- provides a browser for the HL7 RIM and Vocabulary;
- provides functions to assemble the HL7 Vocabulary from the Vocabulary data base (in Access)
- generates Vocabulary MIF files after the assembly
- generates XML extracts from Publication Database (PubDb) for desktop and production publishing.
- Required by:
- RMIM Designer (for acquiring RIM and Vocabulary data from MIF files); and
- Publishing (for extracting "Pub xml" from the Publication Data bases)
- Note: After the installation a splash screen will display "Instructions for the PubDb as of June 2004 are included in the install package in a PDF file. This file does not exist. (Tony Julian)
RoseTree Installation Notes RoseTreeIII is a 32-bit Windows application that runs (and is tested) in
- Windows XP,
- Windows 7 (both 32 and 64-bit installations)
- Windows 8 and 8.1 (is developed and tested in a 64-bit Win 8.1 installation)
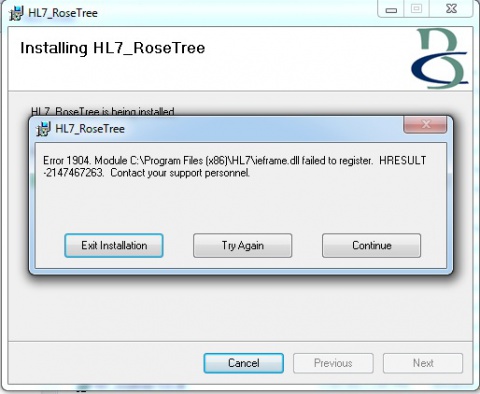
- There is a known "installation error" that displays the following error message:
- This is a nuisance error click "Continue" to complete the installation. The dll in question is installed in all Windows environments as a component of Internet Explorer.
RMIM Designer
- Distributed as RMIM Designer Visio from the RMIM Designer Current Project at GForge
- The HL7 R-MIM design templates provide a suite of Visual Basic software that works in conjunction with the RoseTree software to provide an interactive design capability for HL7 RMIMs. The tools draw their source from the RIM and assure that all elements are appropriately defined using the RIM as a base within the "rules" of the HL7 Methodology.
- Installation:
- Requires a two-step installation process. The downloaded installer installs a program named HL7RmimDesignerInstaller along with the various support files (templates, etc.) required by the designer. HL7RmimDesignerInstaller then appears as a selection on user's programs menu.
- To execute the second step of the installation, run HL7RmimDesignerInstaller.
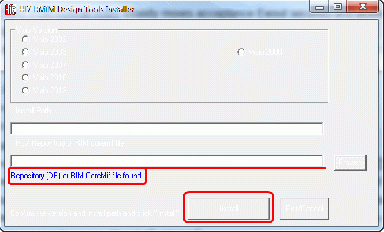
- HL7RmimDesignerInstaller will briefly open Visio in order to determine the Visio version and operating system you are using, then will close Visio again and present the following dialog:
- The installer should have pre-filled the correct value for the Install Path, as determined by the Visio version it detected (in the upper panel). It will also look for the presence of a Design Repository or RIM "coremif" in the same installer location and place the file name in the HL7 Repository file box. If it does not find a repository or coremif, a red warning will be presented. It is not necessary to identify a Design Repository or RIM file at this point, but if you wish to do so the Browse button will help you to select one.
- When the entry fields are correct, click Install.
- If the following dialog appears after installing, click This program installed correctly. to ignore the non-error.
- Initial run of RMIM Designer
- To run the RMIM Designer, open Visio, and select to create a new drawing using the RMIM2 template. The first time it is run, the RMIM Designer will notify you that a menu file has been built. This is normal.
- On rare (fortunately) occasions, opening an RMIM2 template produces an error message. This "failed" installation most frequently occurs because either RoseTree was not installed before this program was run or, the version of RoseTree is older than the RMIM Designer expected. All RMIM Designer documentation is on the Wiki and includes a section on errors which is the best source of assistance in resolving these issues.
Publication Data Base
- Distributed as PubDb under the HL7 V3 PubDb Project at GForge
- The PubDb provides a forms-view front-end to a data base designed around the data relationships in HL7's methodology. It facilitates the documentation of the designs in the interaction model. The DB will also work with XML Spy to provide WYSISYG editing of the limited mark-up that is permitted in the PubDB.
- Although the PubDB is distributed in a Microsoft "installer", there is no true program installed. The installer simply acts as a vehicle for placing the PubDB and a variety of associated files and directories needed for desktop publishing.
- The PubDB is dependent upon the presence of RoseTree, which should be installed first.
WYSIWYG Annotation Editor
Installation of the HL7 WYSIWYG Annotation Editor is a multistage process. These stages involve the installation of the HL7-developed software, the addition of HL7-specific components to the "wwwroot/tinymce" directory structure; and the preparation of older Publication Databases (Access databases) to work with the new editor.
Note: This software has prerequisites that must be installed first.
Stage 1: Installation of HL7 Software Executable
- Download the HL7 WYSIWYG Annotation Editor from Gforge in the V3 Publications project. (This selection page can also be reached from the Gforge home page by following the "Publishing Tools" hyperlink under "Quick Downloads".)
- Distribution is as a Microsoft installer (msi) file that is executed by double-clicking on it. (As with all HL7-distributed installers, if the installer opens a "Remove-Repair" selection screen, you should select "Remove" and execute. Then reopen the installer to install the new release afresh.
- The installer adds the application HL7_EditorPatchAndTestWidget.exe and also adds support files to a new or pre-existing C:\Program files\hl7\PubDb directory.
Stage 2: Addition of HL7-Plugin to TinyMCE
- Find the hl7tinyeditor-webroot.zip zip archive in the C:\Program files\hl7\PubDb directory
- Place a copy of this archive in the local web root at: C:\Inetpub\wwwroot. This will make the archive a sibling to the previously installed tinymce sub-directory.
- Unzip this archive distributing the contents to the "wwwroot" directory.
- This will add a new sub-directory, hl7editor and will add the HL7 plugin content to one of the sub-directories in the tinymce sub-directory.
Stage 3: Patching HL7 PubDb(s) To Use WYSIWYG Editor
The third installation step is accomplished by executing the application HL7_EditorPatchAndTestWidget that was installed in stage 1. This application presents a simple dialog that allows you to (a) select a publication database to be "patched" for use with the new editor, and then (b) to execute the command "Patch Selected PubDb".
- Use the Browse button and navigate to select a publication database that you wish to patch. (The patching process in no way affects either the content or other uses of this publication database.)
- When a database is selected, click Patch Selected PubDb This action performs three separate invocations of the Access application: the 1st and 3rd invocations open the target database that is being, while the 2nd invocation opens the "source" database that holds the patches (installed in Stage 1)
- Each time the database is opened you will be presented with the standard Security Warning' dialog that the databases may contain code intended to harm your computer. (It may contain code that will do harm, but there is no intention to harm.) At each invocation, click the "Open" button to allow widget to proceed.
- The process is complete for the database after the three invocations. At this point you make repeat this process to patch other Publication Databases.
V3 Generator
- Distributed as v3GeneratorTool and v3GeneratorFullSource under the HL7 V3 Generator Project at GForge
- The Generator is a set of XSLT transforms that accept the XML expressions of an HMD (exported from the repository by RoseTree or created directly by Visio) and, through a series of transformations, generates schemas and other representations of the designs, including MIF files.
- The Generator tool is distributed in a ZIP file. Extraction of the ZIP file must preserve the directory structure of the archive. A quick reference guide is installed in the root directory.
- v3GeneratorTool installs the transforms, and Java-based engine used to drive the transforms, along with the "common" reference data such as CMETs, RIM, vocabulary, etc. v3GeneratorFullSource installs the same content as v3GeneratorTool, but also adds the remainder of the source files used to generate the most recent HL7 ballot.
Harmonization (Vocabulary) Tool
- Distributed as Harmonization Tooling under the HL7 Vocabulary Tooling Project at GForge
- There are two distribution packages, a generic package for use in Windows XP, Windows 2000, and Unix environments, and a Windows Vista package that uses the "standard" HL7 installation directory outside of Program Files and thereby avoids file management "pitfalls" that arise when applications write data into that directory,
- Installation:
- The two distribution packages each contain a zip file with a single Java jar file. To install the application, remove the jar file from the zip, and then double-click on the jar file. This is a self-installing file, and a series of dialogs to control the installation will be presented.
- The default installation options can be used. They propose installation in C:\Program Files\HL7\HarmonizationEditor.
- Note that the tool chooses a default directory for storing (and loading) change proposal files (XML files) as
C:\Program Files\HL7\HarmonizationEditor\resources\proposals
- If you wish to change this directory, it can be changed through the Menu...Window...Preferences selection in the application.
- The Harmonization Tool is intended to support the creation of vocabulary update proposals for review at HL7 Harmonization. The tool is built upon a Java implementation of the CTS specification. It draws upon the vocabulary content of a Design Repository, and stores the updated proposal as changes against that repository. The tool is also useful for browsing vocabulary content, particularly as there is a search capability against that vocabulary.
- Documentation is distributed as Vocabulary Tool Documentation under the HL7 Vocabulary Tooling Project at GForge, and is being moved to the Vocabulary Harmonization Tool support page on the Wiki.
Eclipse
HL7 Eclipse tools are distributed as a zip file containing the complete Eclipse environment with the necessary HL7 plugins. This zip-file should be expanded (with directory names turned on) in either "C:\Program Files" or "C:\Program Files\HL7", though in theory any directory will work. Once the files have unzipped, launch Eclipse by invoking the "Eclipse.exe" in the directory created by unzipping the plugin.
If you are not using the HL7 Eclipse tools, but have instead downloaded and installed Eclipse, you will need to add several JAR files as described here: V3 PubProcess - Configuration.
The first action after launching Eclipse should be to open the desired workspace. If you already have an existing workspace, use the File, Switch Workspace command to select the desired workspace. Alternatively, create a new workspace using File, New Workspace.
Within a workspace, you will need to create one or more projects. To do this, select File, New, HL7 V3 Project. Within the resulting project, you will need to copy MIF files and vocabulary files. The MIF files may be taken from the January 2008 release of the v3 generator. The vocabulary file may be exported from RoseTree.
