HL7 WYSIWYG Annotation Editor Manual
Purpose
For some time, HL7 has sought a better WYSIWYG Editor for use with the Publication Database. The New WYSIWYG Editor is an attempt in that direction. Functionally, oit works very well, but it does require that a local Web server be installed on the system where the editor is being used, and this requirement may preclude its use in certain. corporate computing environments.
The new editor uses the Tiny MCE editor as its base. TinyMCE is designed for use on web pages picked up from the server. In order to enable editors to work on HL7 artifacts when they are not web-connected, it is necessary to provide a local Web server to support the Tiny editor. The Microsoft IIS product is a standard component of both Windows XP, and Windows 7, but it is not installed by default when Windows is installed.
IIS can be installed from the installation "disk" for your base operating system. Once installed, it designates an area in your files system (typically, C.:\Inetpub) for the server files and a web "root" directory (C.:\Inetpub\wwwroot) as the "root" of the files that it serves. Once installed, the IIS product can be configured to recognize a specific TCP/IP "port" from which it will accept requests for web pages. It is possible to close down that port in your "firewall" while still using the server from your installed browser. This, in effect, blocks access to the Web server from any external sources, thus maintaining a reasonable degree of security for your system.
Installation Steps
Installation of the prerequisite server and TinyMCE sofware, and the installation of the primary HL7 Editor are detailed elsewhere on the Wiki.
Primary Editor Functions
Editor Components
The HL7 WYSIWYG Editor Widget for use in annotating publication databases is actually a mixed-mode application. The primary, controlling program is, as it has always been, in "Visual Basic for Applications" manages the forms in the Access for the Publication Database.
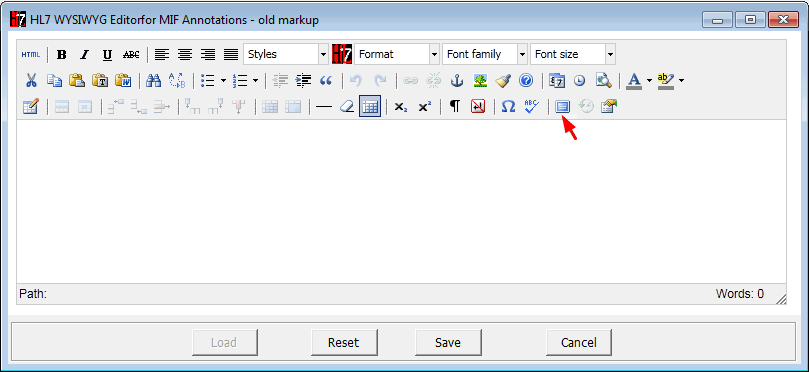
When needed, this program invokes the services of a DLL (dynamic link library) that is installed as part of the WYSIWYG editor. This DLL opens a standard Window (see basic editor window below) with the caption HL7 WYSIWYG Editor for MIF Annotations. This window has four buttons along the bottom, and a single browser pane (the area with the white background).
Relation of Content Control Buttons to Browser Pane
The actual editor sits within the browser pane, it is outlined by a set of tool-bars at the top, a status panel at the bottom, and a sizing handle in the lower right corner. The four content control buttons on the outer window manage the placement of annotations into the editor, and the retrieval of those annotations after editing. The editing controls in the toolbar are managed in Javascript running in the browser pane. Thus they run in an environment that cannot interact with the file system of the host computer. The file system (and Access) interactions are managed through the four content control buttons.
When the editor is first opened, its state is dependent upon whether or not annotation text existed at the place from which the editor was invoked (pre-existing text).
- If a pre-existing annotation was present, the editor will open with the Load and Cancel buttons enabled, and the Reset and Save buttons disabled.
- If there was no pre-existing annotation present, the Load button is disabled, while the other three buttons are enabled.
Functions of the Editor Content Control Buttons
Load: Will insert a previously selected annotation into an empty editor. Once the editor is loaded, the Load button will be disabled.
Reset: At present this does nothing useful but also nothing dangerous. It is a placeholder for functions that will allow the user to save the content periodically with the ability to "go back" to the last saved variant at any time.
Save: As its name implies, this button will save the current content to the designated result field (usually the place from which the annotation was extracted). This Save is will not occur unless the content is valid with respect to the controlling schema. If the annotation can be saved, the editor window will be closed after the save.
- Note: This button should only be pressed when the basic editor display is being presented. It should not be pressed while a "pop-up" window is being displayed in the browser.
Cancel: This button will terminate the current editing session, and make no changes to the source annotation. The application will ask that you verify the intent to cancel. If you respond "No", the editing session will continue.
Window Sizing
The primary window is "free-standing" - independent of the Access window - and can be expanded to occupy the full screen, minimized or restored.
Expanding the primary window to "full screen" the browser container will be enlarged, but the editor itself will not necessarily expand to fill that container. The editor can be expanded by either dragging the sizing button on the lower right of the editor pane, or by clicking the "Toggle fullscreen mode" button in the editor toolbar (indicated by red arrow in diagram above).
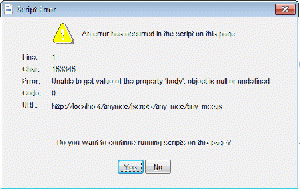
- Note: Occasionally an Internet Explorer Script Error dialog will appear. In the experience of this Toolsmith, it is reasonable and safe to select the Yes button in response to this. Virtually all of these errors seem have arisen shortly after the editor pane (the inner portion of the browser pane) has been resized, and there had never been any evidence of content corruption.
Alternate Display and Support Options
Although the primary intent of this editor is that it be used in the WYSIWYG display, there will be times when the user will need to check for correct XHTML markup. This markup can be seen by clicking the HTML button at the upper left of the editor's tool-bars.
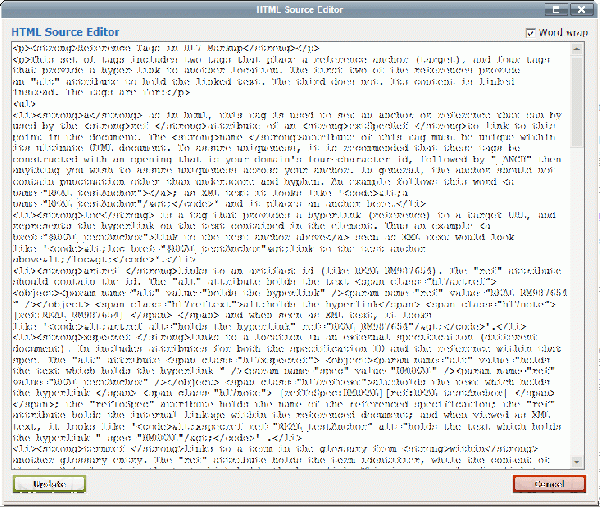
This will display the HTML Source Editor pop up (above) that is presented inside the browser pane. This is a simple XML editor with no special markup. The Source Editor has a "word wrap" option in the upper right corner. Regardless of the setting of word wrap, each major element in the XHTML opens and/or closes at the left-hand margin. There is no indentation display available. The Source Editor is closed by clicking either the Update (keep changes from the Source Editor) or Cancel (discard Source Editor changes) button.
Spell Checker
The editor offers a spell check option in the tool-bars. This option requires yet another special installation. Clicking on the spell-check button will bring up a dialog saying that ieSpell needs to be installed. The dialog offers a link to the web-site where the spell-checker can be downloaded. The spell-checker is free for personal use. You can determine for yourself whether your use would fall under the terms of their license.
Control Key and Tool-bar Commands
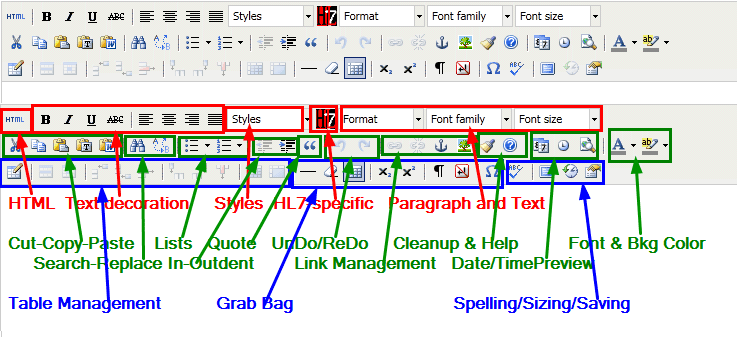
All other functions of the editor are built into the logic supplied by TinyMCE, and are controlled from the editor tool-bars or key-board. . The toolbar and the editor is organized (reading left to right and top to bottom) as follows:
Keyboard Controls
Ctrl-Z will undo the previous action, and when repeated will undo the action before that, etc. Testing indicates that this is fairly reliable..
Ctrl-C, Ctrl-X and Ctrl-V Will Cut, copy and paste as in most applications
Ctrl-F Will present a "Search and Replace Dialog" when the primary editor display is active, and a simpler "Find" dialog when the HTML Source Editor is active.
Ctrl-B, Ctrl=U and Ctrl-I Will toggle Bold, Underline and Italics on selected text or as the default for the next typed characters.
Tool-Bar Commands
The following reviews the tool-bar contents from left to right and top to bottom. It is supplemented by the following annotated figure.
HTML Activates the HTML Source Editor discussed above.
Text decoration - four buttons for Bold, Italics, Underline and Strike-through.
Styles drop down provides text styles for a selected set of text.
HL7 icon button presents a dialog box of seven different forms of HL7-specific markup. These are discussed in a separate sub-section below.
Paragraph and text markup are the remainder of the top row. They include a drop-down for paragraph styles (specifically those that format or indent text in a special fashion), font selection, and font size selection.
Cut-Copy-and-Paste are the first five icons in the second row. They control actions related copy and paste of the text. There are special buttons for pasting "unformatted" text, and for pasting from Word. (The latter has not been carefully tested).
Search-and-replace is a capable and reliable search-and-replace mechanism. Note also that Ctrl-F will activate the search and replace dialog in the main pane.
Lists are the next two buttons that provide for ordered and unordered lists. They including the ability to select alphabetic or Roman and numbering for the ordered lists. Note: that the most reliable way to increase and reduce the indentation of these lists (including ending those lists), is to use the Tab and Shift-Tab keys. However, be advised that he Shift-Tab key will leave the cursor on the previous line, rather than on the new line and a down arrow key will be necessary to correct that.
Indent and outdent buttons work as expected, and can also be used to manipulate the level in the ordered and unordered lists above.
Block quote is equivalent to indent, and is also represented as one of the "paragraph" styles in the top row.
Do and redo buttons do and redo as they say they do.
Link management are the next four buttons that provide for management and establishment of hyperlinks within the document. The first two require a selection of text that is to be linked before they are enabled. Once enabled they either establish or break a hyperlink. The anchor button establishes an anchor at the location of the cursor or the selection. The image button provides for the entry of an image, designation of its location, and other properties. This will produce valid XHTML markup, but has not yet been fully tested.
Cleanup and help are next. The cleanup button promises to clean up messy code although I have rarely found messy code that needed cleaning. The help button takes you to an "about" box that displays the TinyMCE release installed; the plug-ins tab will show the release of the HL7 plug-in at the top, the about tab has hyperlinks to the documentation and reference Wiki at the TinyMCE website.
Date, time and preview buttons provide for the text entry of the current date and time, as well as the presentation of the preview window. The preview window does not, in this Toolsmith's experience, show anything that is not seen in the primary display.
Font and background color are the final two buttons on the middle row. They provide for different font colors and different background colors in text. Use of these buttons and designations are generally discouraged by the Publishing Work Group at HL7, but they can be useful, at times, in distinguishing areas of tables.
Table management is the first 11 buttons in the bottom row. They deal with the definition and management of tables within the editor. They are in subgroups as follows:
- Initial table definition with the "insert into table" button
- Properties the definition of specific properties for table rows and cells
- Row insertion and deletion options
- Column insertion and deletion options
- Merging and splitting of table cells.
Grag Bag of specific functions including:
- Insertion of a horizontal rule (discouraged by Publishing Work Group)
- Removal (erasure) of formatting can be used to remove special formatting from an adjacent area of text.
- Subscripts and Superscripts
- Paragraph button's function remains unclear
- Special-purpose insertions for insertion of non-breaking space and special characters selected from a dialog.
- Spell-checker (see [[#Spell Checker|above)
- Toggle full screen Note that this actually expands the editor pane only within its window. It does not affect the outer window relative to the screen. The window must be changed by its own control in the upper right corner.
- Restore autosaved content is part of TinyMCE. It has an autosave function which periodically saves the content of the screen for restoration. Unfortunately, I have not determined the interval at which the saving is done. It is likely that we will use the "reset" button on the main window as a vehicle for providing user selected intermediate backups.
- Insert or edit attributes selects a dialogue in which one can add a rich set of attributes for the currently selected element. The current element selected is indicated in the status bar at the bottom of the editor pane. On the left of that bar is the hierarchy elements containing the current selection, with the selected element shown at the right end. This is the element whose attributes would be altered if this button is selected. In some circumstances this can provide a an easier and more focused approach to changing the markup, as opposed to going to the full document HTML Source Editor window.
HL7-specific Markup Dialog
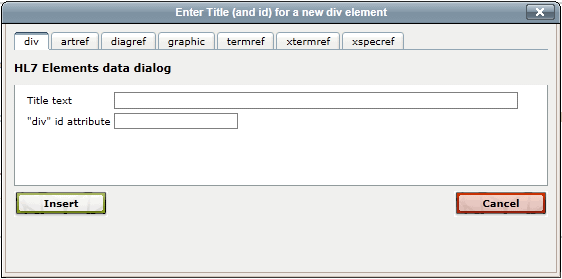
There are seven different markup forms provided in the dialog that is activated when the HL7 button on the tool-bar is clicked. Six of these are not in XHTML, but have been used in HL7 markup for several years, and therefore are retained here for backwards compatibility. The choice to add a particular HL7-specific markup is made by selecting one of the tabs the upper level of the popup dialog. (See below)
Selection of a tab presents a set of text boxes that are specific to the element selected. Specifics of the selections follows:
div - The division encloses a block of content (including other divisions). These are used in the HL7 annotations to establish the hierarchy of headings for the annotations. (These replace the so-called header or "h1" elements.) Because a given annotation may appear at various levels within an HL7 document, these elements are not assigned numbers. Rather the level of the markup is determined at the time it is rendered for viewing. The "div" element two attributes:
- title: contains the text that will to be displayed as the title for the division when it is rendered. This text can contain any reasonable characters. (If the < is used, the editor will replace it with an "escaped" value that will render the same character.
- id: contains the identifier that can be used to reference this division from other places, such as the table of contents. This value of this attribute should be unique within the document in which he annotation will reside.
- Note 1: Once a division has been defined, selection of text with the keyboard or mouse, followed by "drag-and-drop" actions can be used to move text to within a division. This is a lot simpler than attempting to edit the HTML Source to accomplish the same thing.
- Warning Note 2: Editing the division title as it is displayed in the full editor on the screen will not effect a change in the division title that appears in the result. In order to change the division title after it has been entered, it is necessary to open the HTML Source Editor (upper left button) and edit the value of the "title" attribute of the division in question. The text in the "h1" element can be edited at the same time in order that the displayed value matches the actual value in the division.
- Display elements When the div is rendered in this editor, this div shows as a large-type maroon title followed by the value of the ID attribute in green. The extent of the division element is the marked by a gray boundary box will show both the boundaries of the division as well as the hierarchy, because lower-level division elements will be inside the box of the outer elements.
- In the HTML Source Editor, you will see that the title is represented as an "h1" XHTML element. This element is used only for display purposes within the editor. It will be stripped out when the content is saved, leaving the title in the division attribute.
Reference Elements: all the remaining elements in the HL7-specific dialog establishe references to other items, either graphics or locations in the document. In all but the "graphic" element, provision is made for establishing a hyperlink on a selected set of text.
Entry of such references is more readily made by first typing the text to be linked, as well as its surrounding text as in a sentence; then selecting the text that will be linked and clicking the HL7 button while the selection is active. This will cause the dialog to open with the selected text in the appropriate dialog entry, and will help to assure that the reference element is in the right place within the text. The five text-linked references are:
- artref The artifact reference provides for a linkage between text in the document and a specific artifact (such as an RMIM, a storyboard, an interaction, etc.). The artifact is identified by its so-called "combined-Id" such as "PRPA_MR123456UV". In the dialog, the text be linked is shown in the first line (and will appear in the "alt" attribute), while the artifact identifier appears on the second line. A similar pattern of entry fields is used to define the other reference elements.
- diagref The diagram reference links text to a specific graphic diagram. This reference does not display the diagram in question, but rather provides a link to that diagram in another window.
- termref and xtermref The term references link a specific set of text to an encoded term in the glossary. The encoding is found by taking the glossary term as it appears in the glossary, dropping any parentheses, converting all text to lower case, and replacing spaces with underscores. "termref" is intended for references within the glossary itself, while "xtermref" is intended for references from outside the glossary to particular glossary entries.
- xspecref The external specification reference links particular text to another specification (the second line in the dialog box), and perhaps to a particular identifier within that specification (the third line).
- graphic The graphic reference identifies a particular graphic to be displayed in-line with the annotation. The text entry in this instance (topline in the dialog) carries the caption for the graphic when it is displayed.
Reviewing Editor Capabilities
In order to see all of the editor's capability "in action": open the HL7_EditorPatchAndTestWidget application; press the Test button; and click the --> DO --> button adjacent to the upper left-hand text box. When the editor window opens, click the Load button. This will display an annotation that uses all forms of the HL7 special markup, as well as most of the other elements available in the toolbar of the editor.
